Please read this before changing your club’s grip
The liquid used when changing a grip is flammable. Please don’t change the grips near anything such as cigarette, stove or any open flame / hot area. If you spill the liquid there is a chance that your floor or other household items could become discolored or start to deteriorate, please place newspaper or some other form of protection down below you before changing your club’s grip. Finally, please only perform this procedure in an area with good air circulation.
STEP 1 Removing the current grip from the shaft
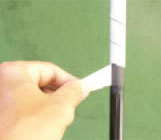
After removing the old grip from your club, please make sure to remove the old double-sided tape as well.
Please try to remove the old grip tape as cleanly as possible. If there is any old tape remaining, it could cause the new grip to be very difficult to put onto the club. If the old tape is a little difficult to remove, please try the two methods outlined below.
- Heat up the old tape using a hair dryer
NOTE: When drying it with a hair dryer, concentrating the heat onto a single spot could cause damage to the club so please be careful. - Try spraying a little bit of the grip change liquid onto the double sided tape and then removing it after wiping dry with a cloth.
STEP 2 Wrap the new tape around the shaft
Please wrap the new tape around the shaft of the club.
NOTE: Before wrapping the tape, please ensure there is enough tape to fit the entire shaft and start from the bottom working your way upwards, this should allow for a cleaner finish.
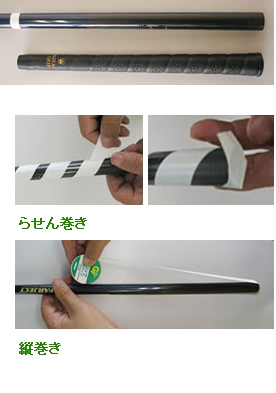
Tape wrapping methods
- Spiral wrap
Just as the picture shows on the left, we will cut the ends of the tape diagonally, making sure the tape doesn’t overlap each other and wrap around in a spiral fashion. Leave about 3cm at the end to peel the upper layer of the double-sided tape and stuff the remainder of the tape into the hole of the shaft to hide it. - Vertical wrap
Just as the pictures show, start wrapping from a shorter place relative to the length of the grip and fold over the hole of the shaft like a lid to create a vertical wrap. When doing this, if you make sure the size of the tape and grip are the same you can make a nice looking finish.
STEP 3 Please spray the grip exchange spray onto the shaft
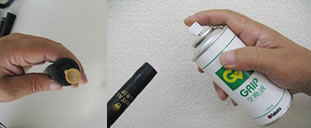
As shown in the picture, you need to place a tee into the grip to make sure the liquid doesn’t get out of the hole, alternatively you can use your finger to cover the hole. Make sure to spray the liquid well and evenly. Please also spray the tape that you wrapped around the shaft in the last step.
STEP 4 Place the new grip onto the shaft
 Take out the tee that is in the grips end and quickly slip the grip onto the shaft of the club in 1 go.
NOTE: Please be careful of any extra liquid inside of the grip as it may fly onto clothing or other items.
NOTE: If you use the grip guide, you should be able to place the grip onto the shaft easily.
STEP 5 Please align the grip and head
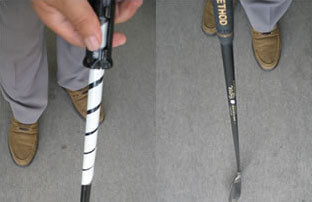
After the grip has been placed properly onto the shaft, make sure to line up the center mark of the grip with the position of the face.
NOTE: When using an iron club use the score line and center mark to align properly. Also make sure that any clubs with a backline are properly aligned. Be careful, if the backline is not properly aligned then you won’t be able to grip securely. Please align so the center mark and grip are perfect.
Lastly please let the club dry for 12 hours in a location with good ventilation before use. For grips that use elastomer please allow them to dry well for around 24 hours before use. Make sure to confirm the grip is solid before use.